Spot and Fix Common Residential Irrigation Problems
Leaks, overspray, or thirsty plants? Learn how we troubleshoot common home irrigation problems and what you can check before calling our team out.
Common Irrigation Problems We See Every Week
We recently got a call from a customer — let's call him David — who sounded pretty frustrated. A few months earlier, we had installed some irrigation upgrades at his home. Now he was seeing three issues:
- One underground pipe was spraying water and washing away soil
- Another head was blasting the side of the house
- The front yard drip system wasn’t giving the plants enough water, and they were fading
We scheduled a morning visit, and as we hung up, we were already running through likely causes in our heads. The truth is, what David was dealing with is incredibly common. If you have sprinklers or drip lines at home, you’ve probably seen some version of these problems yourself.
So we thought we’d walk through how we approach leaks, overspray, and under-watered drip zones — and what you can check before calling us out.
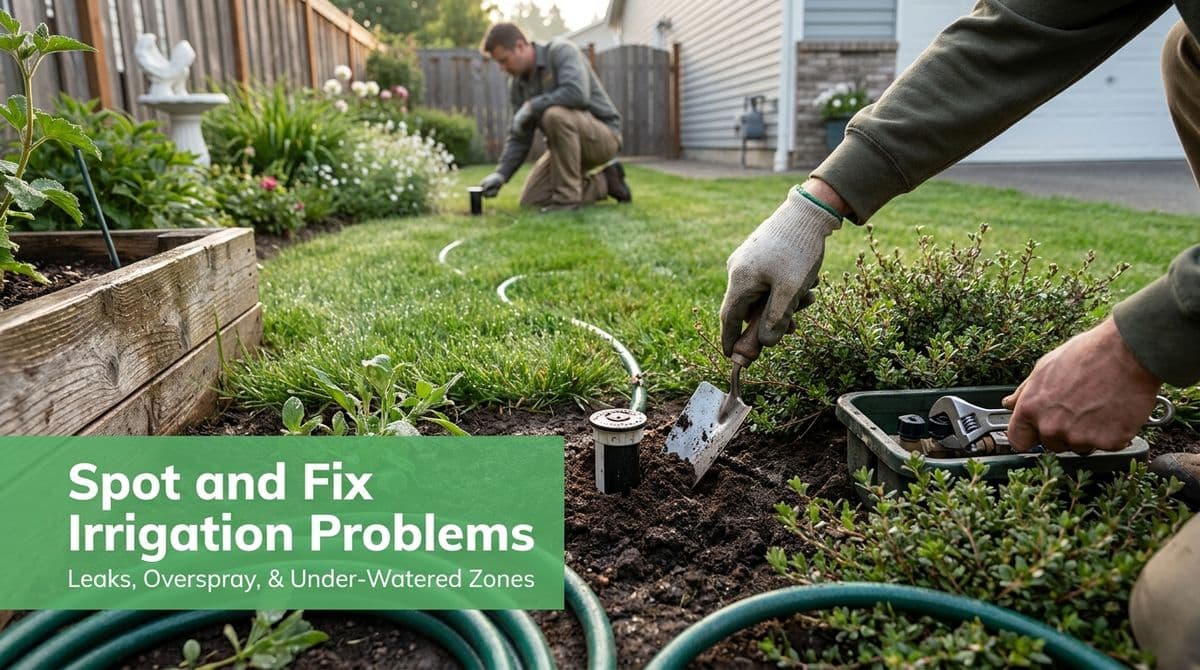
How We Spot and Fix Underground Sprinkler Leaks
When we arrived at David’s place, the first thing we looked at was the area where the dirt was eroding. That’s usually the giveaway for an underground leak: soggy, sunken soil or a little “geyser” of water when the zone runs.
Signs You May Have a Hidden Irrigation Leak
Here are the red flags we look for on a residential system:
- Mushy or sunken spots along a sprinkler line
- Water bubbling up from the ground when a zone is on
- Exposed roots or washed-out mulch or soil
- Unusually high water bills compared to prior months
With David, we could see soil washing away around one of the lateral lines. We turned on that specific zone, watched for where water surfaced, then carefully dug down to find the break.
Basic Steps to Repair a Broken Irrigation Pipe
If you’re comfortable with simple DIY work, here’s the general process we follow:
- Shut off the irrigation water at the valve or main shutoff.
- Turn on the zone briefly to pinpoint the leak area, then turn it back off.
- Dig carefully with a hand trowel around the wet spot until you expose the pipe.
- Cut out the damaged section with a PVC cutter.
- Dry-fit a repair using couplings and a short piece of matching pipe.
- Prime and glue the fittings (for PVC) and let them cure as directed.
- Backfill gently, tamping soil in layers to avoid future settling.
If the leak is near valves, multiple fittings, or electrical wiring, our team recommends calling a pro. A quick “fix” in the wrong spot can create bigger problems later.
Overspray: When Sprinklers Soak the House Instead of the Lawn
David’s second issue was a head that sprayed directly onto the side of the house. Besides wasting water, that constant moisture can stain stucco, damage paint, and even lead to foundation problems if it’s pooling near the wall.
Why Sprinklers Overspray
Our team usually sees overspray for a few common reasons:
- Heads knocked out of alignment by pets, kids, or lawnmowers
- Wrong nozzle type with too wide a spray pattern
- Too much pressure causing misting and drift
- Poor original layout — heads aimed at hardscape or walls
With David, the head itself was fine, but it had been bumped and turned, so the arc was aimed right at the house.
How We Adjust and Correct Overspray
Here’s how we typically fix this on a service call, and what you can try yourself:
- Run the zone and stand behind each head so you can see where it’s throwing water.
- Gently turn the riser left or right to aim the spray back toward the lawn or bed.
- Use a screwdriver (on adjustable nozzles) to change the arc and radius so you’re not watering walls, sidewalk, or street.
- Swap nozzles to a lower-angle or different pattern if the current one just doesn’t fit the space.
- Consider pressure regulation if you see fine mist blowing away; pressure-regulated heads or a regulator on the valve can make a big difference.
On David’s system, a quick alignment and a nozzle swap were enough to keep water on the landscape and off his siding.
Under-Watered Drip Zones and Thirsty Plants
The last issue David mentioned was his front yard drip system. The plants were fading, even though the drip was running on schedule. Our team sees this a lot, especially on older or expanded systems.
Common Causes of Weak Drip Performance
When drip plants struggle, we usually look for:
- Clogged emitters from minerals, dirt, or mulch
- Too few emitters per plant, especially as plants mature
- Incorrect run time — drip generally needs longer cycles than sprinklers
- Pressure or flow problems when too many emitters share one line
- Damaged tubing that’s kinked, pinched, or chewed
With David’s drip zone, we walked the entire line, checked each emitter, and found a mix of clogged emitters and a schedule that was just too short for the plant sizes he had.
What You Can Check on Your Drip System
Before you assume your drip “just doesn’t work,” try this quick checklist:
- Turn on the drip zone and wait a few minutes, then feel the soil near each plant. It should feel moist several inches down.
- Inspect emitters one by one; if some aren’t dripping, clean or replace them.
- Count emitters per plant. Larger shrubs often need 2–3 emitters spaced around the root zone.
- Check the filter and pressure regulator on the drip line; a clogged filter can starve the whole zone.
- Lengthen run times rather than watering more often; drip is meant to water deeply and less frequently.
In David’s case, our team replaced some emitters, added a few more for the bigger plants, and reprogrammed the controller so the drip ran longer but less often. Within a couple of weeks, the plants started bouncing back.
Our Full-System Irrigation Checkup Process
Whenever we come out for problems like David’s, we like to do more than just patch the obvious issues. Our team runs a quick full-system health check so we can catch small problems before they turn into leaks or dead plants.
Here’s what that usually includes:
- Running each zone one at a time while we walk the property
- Checking spray patterns and coverage so grass and beds are evenly watered
- Inspecting for leaks, overspray, clogged heads, and broken fittings
- Testing valves, filters, and pressure on both spray and drip zones
- Reviewing the controller programming (start times, days, and run durations)
Often we can make a handful of adjustments in less than an hour that save water and keep the system running much more efficiently.
A Simple Seasonal Irrigation Checklist for Homeowners
To keep your system in good shape between service visits, our team recommends a quick check at least spring and fall. Here’s a simple seasonal routine you can follow:
- Spring: After winter, run all zones, look for leaks, realign heads, flush drip lines, and update schedules for warmer weather.
- Mid-Summer: Spot-check high-use areas, adjust for heat waves, and look for dry spots or runoff.
- Fall: Dial back run times as temperatures drop, clear leaves from around heads, and check that drip is still reaching plant roots.
- Anytime: If you see puddles, constantly wet areas, or struggling plants, don’t wait — run that zone and see what’s going on.
Catching issues early keeps your water bill lower, protects your home’s exterior, and gives your landscape the consistent moisture it needs.
When to Call Our Team
Some irrigation fixes are simple DIY projects, and we’re always happy when homeowners feel confident adjusting their own systems. But if you’re dealing with underground leaks, repeated overspray, or whole drip zones that never seem right, it may be time to bring in our team.
When we helped David, we were able to repair the broken pipe, correct the overspray, tune up the drip, and leave him with a system that watered efficiently instead of wasting water and stressing plants. If your yard sounds a bit like his, we can walk through the same process at your home and get everything flowing the way it should.